Vented Crawl Spaces Do Not Work in This Climate
The vented crawl space was built on a reasonable-sounding idea: put openings in the perimeter wall, let outside air flow through, and the space stays dry. In a hot dry climate that works. In the mixed-humid climate of southeastern Pennsylvania it does the opposite for roughly four months of the year, and building science has understood this for decades even though the practice persisted well into the 1990s.
Here is the failure, in one paragraph. A crawl space in Montgomery County stays cool — the ground keeps it somewhere around 55 to 65°F in summer. From June through September, outdoor air carries dew points in the mid-60s to low 70s°F. Open the vents and you are deliberately pulling that humid air into a cool space. It hits the cool floor joists, the cool subfloor, the cool ductwork and the cool plumbing, and it condenses. The vents that were supposed to dry the crawl space are actively wetting it, every single summer day.
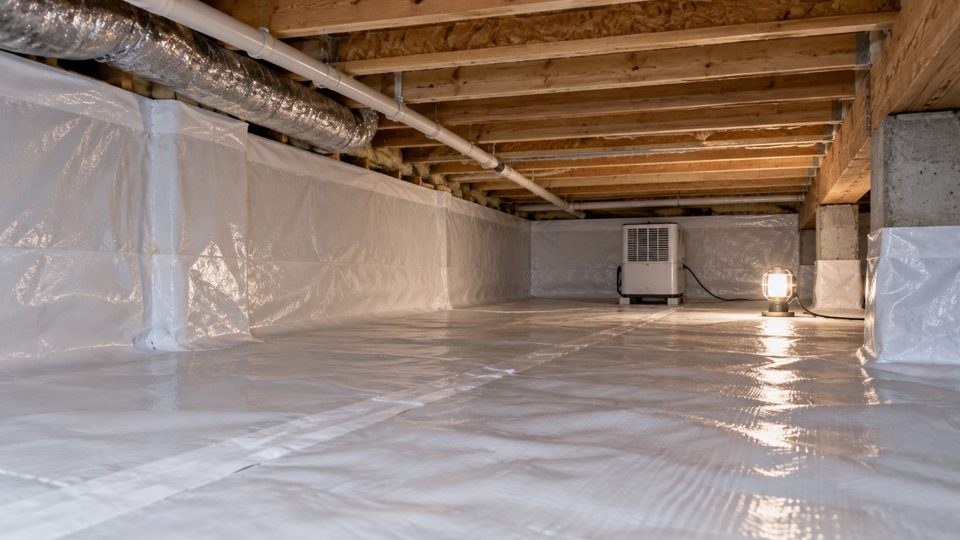
The modern, code-recognised solution is to close the crawl space entirely — seal the vents, install a sealed vapour barrier over the earth and up the walls, insulate the perimeter wall rather than the floor above, and either condition the space or dehumidify it. This is the opposite of what most homeowners have been told, and it is what actually works here. The International Residential Code has permitted unvented, conditioned crawl spaces for many years.
Where Crawl Spaces Occur Around King of Prussia
Full basements dominate this region, so crawl spaces here tend to be found in specific circumstances rather than as the standard foundation type. They appear under additions built onto older homes, where the addition sits on a shallow foundation while the original house has a cellar. They appear under sections of historic farmhouses in Gulph Mills, Valley Forge and rural Chester County, often as low, uneven, dirt-floored voids with stone perimeter walls. They appear under 1950s and 1960s ranches on sloping lots, particularly where a house steps down a grade. They appear in portions of 1980s and 1990s developments where site conditions or rock made a full excavation uneconomic. And they appear under sunrooms, porches and converted garages.
The common thread is that these spaces are rarely visited. A basement gets used; a crawl space gets entered once every several years, usually by a plumber. Problems there develop undisturbed for a very long time.
What Goes Wrong Down There
- Summer condensation on the joists and subfloor. The primary mechanism, described above. The signature is growth on the underside of the subfloor and along the lower faces of the joists, worst in the centre of the space and often worst directly under bathrooms and kitchens.
- Evaporation from bare earth. An uncovered dirt floor releases a remarkable quantity of water vapour continuously — on the order of several gallons per day for an average crawl space. Without a vapour barrier, the space can never be dried.
- Standing water and poor drainage. Crawl spaces are frequently below the surrounding grade with no positive drainage. Water enters after heavy rain and sits.
- Plumbing leaks running unnoticed. A supply or drain leak in a crawl space can run for months. Nobody is down there to see it.
- Ductwork condensation. Air conditioning ducts running through a humid crawl space condense on their exterior if the insulation is damaged, missing or has fallen away — which after twenty years it commonly has.
- Fibreglass insulation falling out of the joist bays. The classic crawl space image: sagging, blackened batts hanging out of the floor framing. Once wet, faced fiberglass loses adhesion, falls, and leaves the subfloor exposed while the batt itself becomes a spore reservoir.
- Wood-destroying fungi. Distinct from surface mold and considerably more serious. Sustained moisture above roughly 28 to 30 percent in structural wood permits decay fungi to establish, which degrade the wood’s structural capacity. This is a structural issue, not an air quality one, and it requires a different assessment.
- The stack effect connection to your living space. This is the point most homeowners do not realise. Air moves upward through a house, and a meaningful fraction of the air you breathe on the first floor originated in the crawl space, drawn up through gaps around plumbing penetrations, ductwork chases and the subfloor itself. Crawl space air quality is not isolated from the house. It is upstream of it.
Remediation and Encapsulation, Step by Step
- Assess and diagnoseMoisture readings on the joists and subfloor, humidity and surface temperature measurement, identification of any bulk water entry, and a structural check for wood decay as distinct from surface mold. Photographs matter here because you will not be going down to look yourself.
- Remove standing water and correct drainageWhere water enters, the exterior grading, downspouts and any interior drainage must be addressed. In a crawl space with a recurring water problem, a perimeter drain to a sump is often necessary.
- Remove contaminated materialsAll fibreglass insulation, any old plastic sheeting, debris, and any wood too degraded to salvage. The insulation always comes out — it cannot be cleaned.
- Clean the structureHEPA vacuuming of joists and subfloor, then mechanical cleaning. For heavy staining on framing, abrasive methods such as soda or dry-ice blasting are common. Antimicrobial treatment is applied after cleaning, not instead of it.
- Dry the spaceDehumidification and air movement to documented moisture targets in the wood. Do not allow a vapour barrier to be installed over structure that is still wet.
- Install the vapour barrierReinforced polyethylene, typically 10 to 20 mil, laid over the entire earth floor with overlapping seams taped, and run up the perimeter walls and mechanically fastened. A thin unsealed sheet loosely laid over the dirt — which is what many older homes have — does very little.
- Seal the vents and air-seal the perimeterVents are closed and sealed. Penetrations for pipes, wires and ducts are sealed. The rim joist is air-sealed and insulated.
- Insulate the walls, not the floorRigid foam or closed-cell spray foam on the perimeter wall brings the crawl space inside the conditioned envelope. This is the key conceptual change: the crawl space becomes part of the house rather than part of the outdoors.
- Provide conditioning or dehumidificationEither a small supply of conditioned air from the HVAC system, or a dedicated crawl space dehumidifier with a condensate pump. Then monitor it — a humidity sensor you can read from inside the house is cheap and means you will actually know if something fails.
- Eliminates the summer condensation cycle that causes the growth
- Stops several gallons a day of ground moisture entering the building
- Improves first-floor air quality, because crawl space air is upstream of it
- Reduces heating and cooling loss where ducts run through the space
- Removes the habitat that attracts insects and rodents
- Makes a subsequent radon mitigation system considerably more effective
What to Be Careful About
Encapsulation over an uncorrected water problem. Sealing a crawl space that still takes on liquid water traps it. Drainage first, always.
Combustion appliances in the space. If there is an atmospherically vented furnace or water heater in or adjacent to a crawl space being sealed, combustion air and venting must be evaluated. This is a carbon monoxide safety question and it is not optional.
Encapsulation sold as a cure for everything. It is a good, durable solution to a specific set of problems. It does not fix a roof leak, a plumbing failure, or a mold problem that originated upstairs. Be wary of a quote that proposes encapsulation before anyone has diagnosed why the space is wet.
Cheap barriers. A 6 mil unreinforced sheet laid loose is not encapsulation. It will tear within a year of anyone crawling on it. The reinforced 12 to 20 mil products with taped seams and mechanically fastened wall terminations are what the term actually means.
Frequently Asked Questions
In this climate, closed — but only as part of a complete job. Simply shutting the vents on a crawl space with a bare dirt floor and no dehumidification makes matters worse, because you have removed the limited air exchange while leaving the ground moisture source in place. The sequence that works is: correct any bulk water entry, seal a proper vapour barrier over the earth and up the walls, seal the vents and penetrations, insulate the perimeter wall, and then condition or dehumidify. Done as a package it is a genuine and durable improvement. Done by closing the vents alone it is a mistake.
General market ranges for the Greater Philadelphia area: remediation alone — removing insulation, cleaning and treating the structure, drying — roughly $2,000 to $7,000 depending on size and access. Full encapsulation with a reinforced vapour barrier, sealed vents, perimeter wall insulation and a dehumidifier, roughly $5,000 to $15,000. Add a perimeter drain and sump where drainage correction is needed, typically $3,000 to $9,000 on top. Very low clearance, difficult access, or a space requiring structural repair pushes these higher. Planning ranges, not quotes.
Possibly, and it is worth establishing which you have, because the two look similar to a non-specialist and have very different implications. Surface mold discolours wood but does not weaken it. Wood-decay fungi — brown rot and white rot — actually consume the wood and reduce its structural capacity. The practical field test is probing: press a screwdriver or an awl firmly into the affected wood. If it is hard and the tool barely marks it, you are most likely looking at surface growth. If the tool sinks in, or the wood is spongy, crumbly or has a cubical cracked appearance, that is decay and it needs a structural assessment rather than a mold assessment. Decay requires sustained moisture content above roughly 28 percent, so its presence also tells you the space has been genuinely wet for a long time.
You can, and for a clean, tall, accessible crawl space with no existing mold it is a reasonable DIY project. Use reinforced material of at least 10 mil, overlap seams by twelve inches and tape them with the manufacturer's seam tape, run the barrier up the walls at least six inches and fasten and seal the termination, and cut it neatly around piers. Where it stops being a DIY job: if there is existing mold or insulation to remove, if there is standing water, if clearance is under roughly eighteen inches, or if there is any question about wood decay. Working in a contaminated crawl space without proper respiratory protection in a confined space with poor ventilation is genuinely unpleasant and not risk-free.
Yes, and this is the part most homeowners underestimate. Air moves upward through a building by the stack effect, and a substantial fraction of the air on your first floor was drawn up from below through gaps around plumbing penetrations, duct chases and the subfloor itself. Estimates in the building science literature commonly put the figure somewhere between a quarter and a half of first-floor air, depending on the house. The crawl space is not a sealed compartment under the building. It is the intake. That is why crawl space work frequently resolves an air quality complaint on the floor above that seemed to have no local cause.